Login / Sign Up

In-App WiFi Connection CMS Setup

An overview of how to setup Call-to-Actions in your app to connect to your local WiFi

Jamie McDonald

HXP Admin

There are three areas where you can add a call-to-action, to allow a user or their holiday party to easily connect to a WIFI connection.

  • From a Home Alert – Information box which shows quite near the top of the main app landing page
  • From a Home Banner – Also shows on the main app landing page but lower down and simply shows an image and title as a clickable banner
  • From a Welcome Pack Item, or Place Alert Box – This shows on the overview tab of the detail page for a welcome pack item, onsite place, or offsite place.

Click here for more information on setting up welcome pack items.

Click here (coming soon!) for more information on Home Alerts and Home Banners.

Home Alerts / Banners

Home alerts and home banners have a similar setup – the main difference being that a banner simply requires a title and image, whereas an alert box has more options and copy available.

  • CMS Side Menu -> Core Setup -> Home Alerts or Dashboard -> General Tab (default) -> Home Alerts
  • CMS Side Menu -> Core Setup -> Home Banners or Dashboard -> General Tab (default) -> Home Banners

Once you have setup a home alert or banner it WILL NOT automatically appear in the app. That alert or banner is now ready to assign when you wish, to either your single park, or group site records. This means you can pick and choose when it appears in the app without having to repeatedly set it up.

Set up the design of your alert box or banner:

Home Banner

  • Title – To identify it in the CMS – not guest facing
  • Banner Image – The background image of the banner – This needs to be a jpg, png, or webp at at least 1200 pixels wide
  • Banner Title – The title that renders on the banner (can be different than the record title)

Home Alert

  • Title – To identify it in the CMS – not guest facing
  • Box Title – The title that renders at the top of the box (can be different than the record title)
  • Box Copy – Multiline text for the copy that renders in the box
  • Style – Choose from default Standard / Info or a negative Alert / Warning. These show an example in the CMS but in the app, will be representative of your branding colours
  • Style : Custom – If you choose custom style you can then choose from some available icons or upload your own icon. You can also set your own custom colour
In-App WiFi Connection CMS Setup

Example home alert rich content setup

In-App WiFi Connection CMS Setup

Segmentation

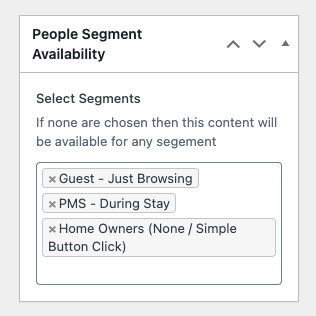
If you have the ‘People Module’ enabled on your holidaymaker install, you can choose to segment this to different sets of guests like you can any other content. That means it would only show for users who fit those segments.

Holiday park clients who do not have the premium people module, can still do some basic segmentation using the ‘Availability’ field which will show before the box title. This lets you filter to holiday home owners, guests signed in, or guests signed in who are also during their stay.

Both of these methods means you can restrict the WiFi connection call-to-action from being available based on the users stay/segment.

Call-to-Action / Intent

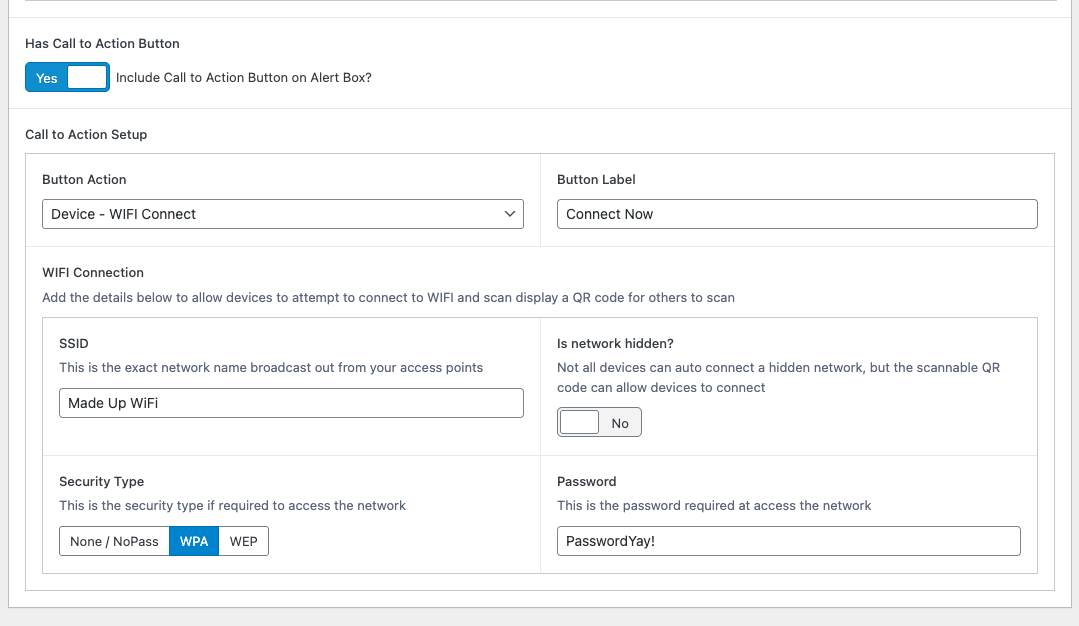
For a home alert, you need to tick on that this alert has a Call-to-Action. Home banners always need an intent so will show anyway.

The Button Action / Banner action which you need to use is Device – WIFI Connect

For home alerts you will also need to add a Button Label eg Connect Now

WiFi Connection

Choosing the WIFI Connect action will reveal 3-4 new fields to then enter your wifi details:

  • SSID – This is the name of your network. This needs to be accurate, and on some systems can also be case sensitive.
  • Is network hidden? – Some devices can connect to WIFI which is not normally visible on the network lists, but is still there. It would be uncommon for this to be needed – but the option is there if required.
  • Security Type – Choose None if the network is open with no password, else choose which password protocol it would be. The most common on modern networks is WPA (Choose this for WPA2 as well)
  • If WPA or WEP is chosen, then a password field will show. This needs to be exact and is case sensitive. Our system also does NOT allow passwords with any spaces at the start or end of the password, as that will always be stripped off.
In-App WiFi Connection CMS Setup

Example connection details added to a home alert

Once your home alert or banner is setup, it will not show in the app until you assign it to the home screen. This can be done in the Home Alerts / Banners Tab found:

  • Single Site / Single Park Clients : Core Setup -> General and App Setup -> Holidaymaker General Field Group
  • Group Site / Multi Park Clients : Group Sites -> Select a site to edit -> Holidaymaker General Field Group

Welcome Pack / Place Alert Boxes

Welcome pack and place records can include an optional alert box to show in the details page in the app. This is setup in a very similar way to home alerts but with a few slight differences:

  • Find the Alert Box / Info / Takeaway / Link field group, which by default is about half way down the edit page of the records
  • Tick on the switch to Enable the alert box. This will then reveal some more fields
  • Style, Title, and Copy work the same as the above Home Alert examples
  • The highlight text is a solid callout bit of text often used for special offer promo codes or similar. This typically would be left blank for a WiFi connection box
  • Button Mode should then be set to App Intent, which then reveals fields which then work the same as the Home Alert and Home Banner setups above.


In-App WiFi Connection CMS Setup

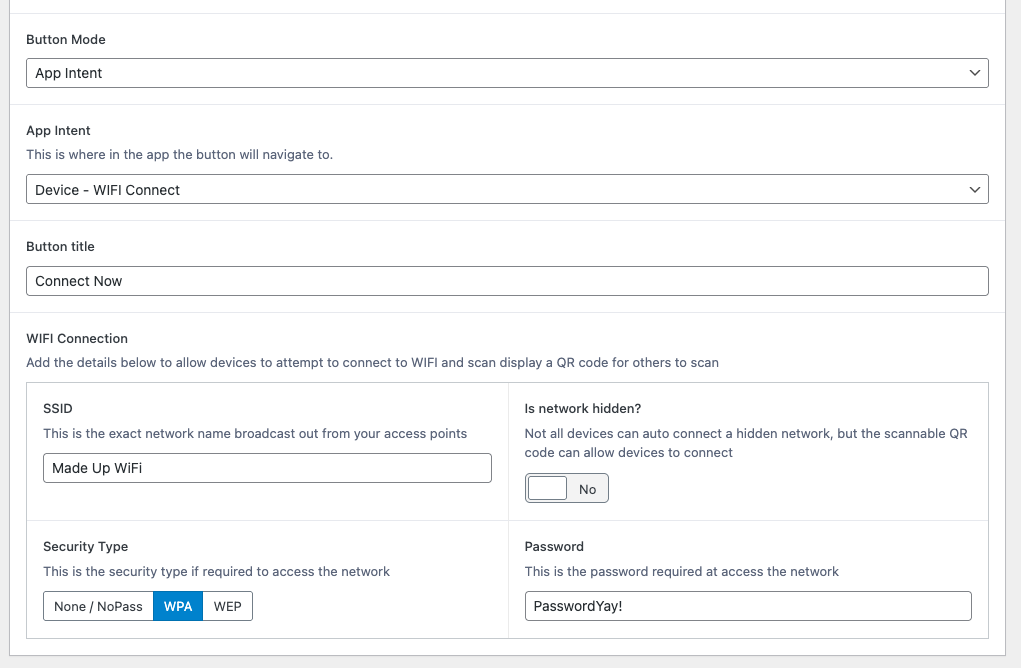
Example welcome pack alert box app intent setup for WiFi connection